Forums › Forums › Get Technical › Tips & Tricks › Elsinore’s Guide to Creating Fake Ghost Photos
- This topic has 13 replies, 6 voices, and was last updated 19 years, 6 months ago by
erond.
-
AuthorPosts
-
November 2, 2006 at 10:26 pm #791
Elsinore
Keymaster(Reposted from Flickr)
First some history: Ghost/spirit photography stretches back to the late 1800s, when there was also a rise in Spiritism, Mediums, etc. Back then film was incredibly "slow", so long exposures were just a fact of photography, and subjects had to remain still for quite some time while the film was being exposed. Shots of “ghostly” images began to surface, and I would suspect many of these are faked (intentionally or unintentionally), primarily a consequence of the long exposures necessary to create a crisp image on the film. Moving subjects, or subjects that are only in the frame briefly during exposure will produce a ghostly image. Similarly, a double exposure in which the same frame of film is exposed two times will result in a ghostly image as the different exposures will overlay one another.Over the years other faking methods have developed, including the use of smoke or dust in the air, silly string (oddly enough–use flash while an accomplice shoots it off, and it looks like”energy streams”), or just plain ol’ Photoshop. The “orb” pictures most people have seen are often produced from dust motes in the air, lens flare, flying insects, and/or digital artifacts from older digicams.
So anyway, obviously for Farktography, PS’ing a ghost was right out. But I’ve seen plenty of pictures of smoke that people claimed were ghosts, and I figured a long exposure shot might be easy enough to pull off.
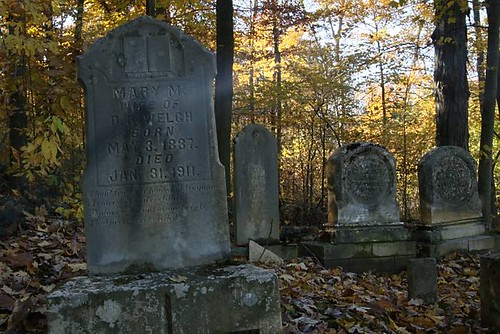
For my first shot, I decided to try the smoke ghost. I called up my cousin’s husband, a smoker, because I figured he could blow some smoke into my pictures. Alas, he was not available the day I was going to shoot. I briefly considered taking up smoking for Farktography when I remembered I had a decent supply of large incense sticks. Huzzah! I headed out to the cemetary behind my house with tripod, incense, lighter, and camera in hand.
I set up in front of one stone and lit up the incense. I wanted a longish exposure to let the smoke waft around a bit in the frame, so I set my ISO to 100 and went with a very small aperture. Even so, it was difficult to get more than about a 1/5 second exposure. Wind was also an issue with this shot. If it was blowing much at all, the smoke was quickly scattered, so I had to wait for any breeze to die down. I held the incense stick near the end of the lens while I had the autofocus point on the gravestone prefocused. I also tried moving the incense stick while taking the shot, but that didn’t work out so well as you see in this straight-out-of-camera outtake:
http://www.flickr.com/photos/lady_elsinore/286569275/
See the incense stick? Well anyway, I took 21 different shots, trying different combinations of exposure times, moving or not moving the incense, wind blowing a bit or not blowing, etc, but I got one I was really happy with, that didn’t look quite as obviously like smoke:
http://www.flickr.com/photos/lady_elsinore/283166422/
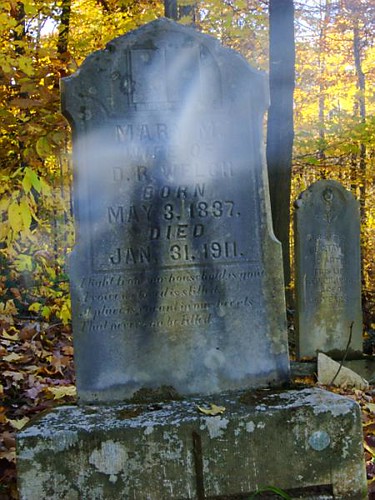
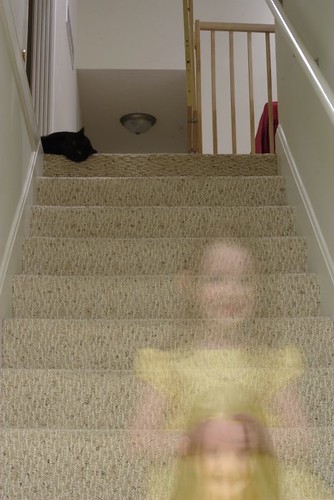
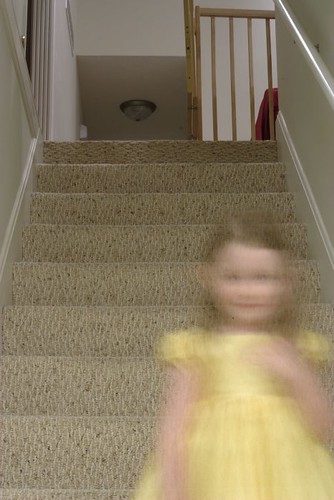
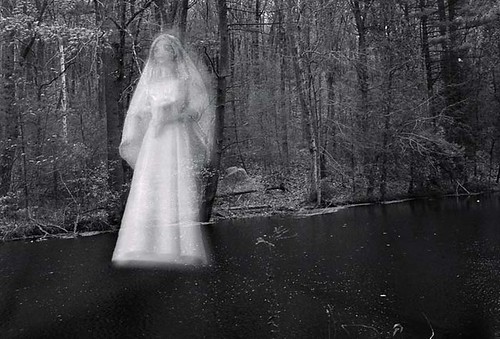
I ended up cropping because the overexposed sky and foliage was making me twitch, and it was very difficult to get a Fark-friendly file size with all that foliage anyway. (Today’s tutorial brought to you by the letter ‘F’!) Btw, I also had to watch the amount of unsharp mask I ran on this, because it changed the appearance of the smoke just a bit.For my next shot, I initially thought of doing a self timer’d long exposure on me, maybe dressed up in something suitably scary or even historical garb. But I figured using a child might yield a creepier result. Luckily I had a semi-willing child at the ready, and she is of an age where she can generally follow directions. Once properly bribed with candy and dressed in something that was vaguely old fashioned, we were ready to go. I set up at the bottom of our stairs where the lighting isn’t particularly bright. I wanted about a 10 second exposure and planned to start with the subject in the frame for about 3 seconds (I can’t say I developed those times myself–I read of something similar online). A 10 second exposure worked out to be f/20 at ISO 100. Luckily, this shot only took 8 takes to get it right, but we had a number of outtakes along the way..
In this first one, it would have been awesome since the cat at the top of the stairs was still throughout the exposure, and I could have claimed that I was taking a picture of the cat. But alas, my ghostly assistant did not duck down out of the frame far enough:
http://www.flickr.com/photos/lady_elsinore/286569280/
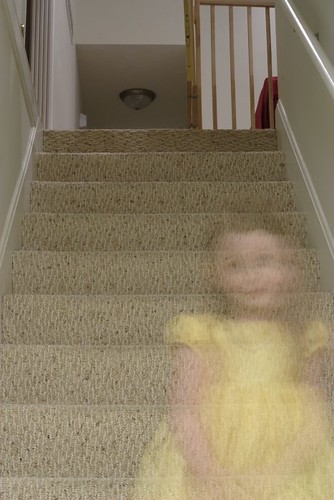
A few frames later, and the cat decided to take off during the shot (you can see the black smudge near the top of the stairs). That might have been ok, but 3-4 seconds is a long time for a 4 yr old to stand still, and you can see her movement in the shot:
http://www.flickr.com/photos/lady_elsinore/286569282/
I also played with the amount of time my ghost was in the frame. In this one, it was about 6 seconds, and you can see she’s much too solid in appearance, on top of showing too much movement blur:
http://www.flickr.com/photos/lady_elsinore/286569284/
This one I backed it off to 4 or 5 seconds, but she wasn’t still enough and was making a funny face to boot:
http://www.flickr.com/photos/lady_elsinore/286569285/
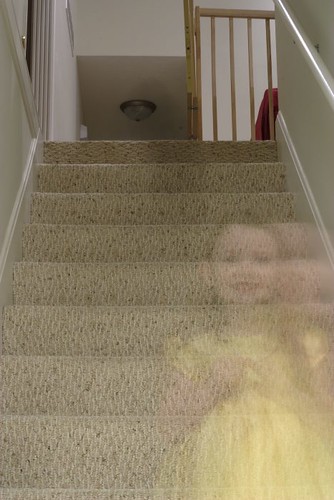
Finally I did a count of 2, and my ghost stood still enough and got quickly enough out the frame that we had a pretty good ghost pic:
http://www.flickr.com/photos/lady_elsinore/285262378/
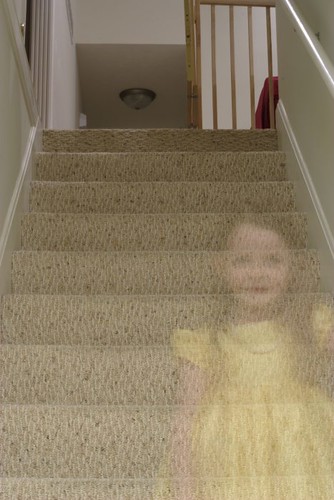
The challenge on these shots is having your subject in the frame long enough but not too long. I know Diggin has already tried this out and can attest to the fact that a single second can really change the appearance of your ghost. For my shot, 3 seconds was the maximum, but 2 was better. Anything over 3, and my ghost was looking a bit too solid, and having a hard time keeping still to boot. I didn’t try 1 second, but I would imagine you would have hardly seen her. If you decide to try a shot like this, your times will vary based on your lighting, of course. Like the smoke ghost, I also had to be careful with unsharp mask–too much, and it ruined the soft transparent apperance of my ghost.
So anyway, there you have it. If any of ya’ll decide to try some spooky shots like these (or already have!), feel free to post them here and show them off!
/I’m lookin’ at you Diggin
November 3, 2006 at 6:37 am #7261Klahanie
ParticipantNice work Elsinore. Your daughter is a good sport. 🙂
November 3, 2006 at 2:09 pm #7262KeymasterThanks, GalleyWench 🙂 And yeah, she generally is 😉
November 3, 2006 at 2:32 pm #7263Diggin
ParticipantHer is Elaina… gh”O”sted
Same 10 second exposure as Elsinore but a higher f/# because this was shot in daylight.
 November 3, 2006 at 3:43 pm #7264Keymaster
Great job, Diggin! Thanks for sharing your shot 🙂
November 3, 2006 at 4:54 pm #7265trvonder
Participant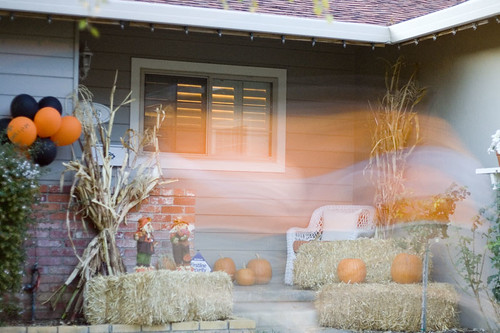
Here is my ghost shot. The “ghost” is me running through the shot. The camera was on a tripod using a self-timer. The picture was taken at night, so a long exposure resulted in correct lighting.
November 3, 2006 at 7:41 pm #7266KeymasterNicely done! I’ve seen “ghost” shots like this as well, where they’re more a streak. Do you have your shutter speed and f/stop number on this shot?
November 3, 2006 at 7:58 pm #7267ParticipantThis picture was an afterthought, after trying to get a picture of the decorations in front of our house. Looking at the camera settings, they do not make a whole lot of sense.
50 MM f 1.8 0.5 seconds ISO 800. See more here
November 3, 2006 at 8:39 pm #7268Keymasterlol wow you covered a lot of ground in a half second! The bonus here is that from your exif, your shot probably would give less appearance of being faked because the exposure isn’t as long.
November 10, 2006 at 12:14 am #7269sleeping
ParticipantI took my ghost with a Nikon n8008s which has a multiple exposure feature. It has to be enabled for each shot, though, and I forgot a couple times, so here’s a single exposure of the “ghost”:
And here’s another one I decided not to use, this is a triple exposure: 1 for the background (-1 exposure compensation), and 2 for the “ghost”, one in focus, the other out, (both at -2 EC).
 November 10, 2006 at 12:57 am #7270Keymaster
Thanks for sharing that, sleeping! I think yours was the only double exposure ghost in that thread, and among digital cameras, the Nikon D200 is the only camera able to do an in-camera double exposure. Nice work 🙂
November 10, 2006 at 1:30 am #7271ParticipantAnother reason to keep shooting film
 November 10, 2006 at 2:29 am #7272Keymaster
Among other reasons 😉 I only really gotten into photography in the past year, but I’ve really geeked out over it. My dad has a Canon AE-1 Program and some lenses, and I borrowed them a few weeks back. I’ve almost finished my first roll with it, and I’m excited to see how the pictures turned out. Haven’t tried a double exposure yet…will definitely have to do that!
January 26, 2007 at 5:04 pm #7273erond
ParticipantI’ve briefly played around with long-duration/ and multiple-flash exposure (dark room, long-exposure, position subject, flash – move – repeat), and was interesting but not impressive. More work would have probably got some “oooh” pictures. When the lighting is too bright to get a long exposure, use ND (neutral-density) filters (or even a big pair of sunglasses) over the lens. It reduces the amount of light and increases the needed exposure when you can’t get the film speed slow enough or the aperture small enough.
-
AuthorPosts
- The topic ‘Elsinore’s Guide to Creating Fake Ghost Photos’ is closed to new replies.