Forums › Forums › Get Technical › Tips & Tricks › Quick-n-Dirty Guide to White Balance
- This topic has 6 replies, 5 voices, and was last updated 18 years, 10 months ago by
boringolddoug.
-
AuthorPosts
-
April 19, 2007 at 2:15 am #938
zeke
ParticipantGetting the white balance “just so” can be a little tricky, but fortunately there’s a couple ways to make it a little easier. Most digital cameras have an ‘auto white balance (AWB)’ feature on them, but sometimes that doesn’t quite get the job done very well. The toughest part is getting the camera to know exactly what “white” looks like, so the sensors properly render the image. If you can’t nail it exactly in camera, that’s okay, it can be fixed in post-proc. The goal in camera is to get it as close to correct as you can.
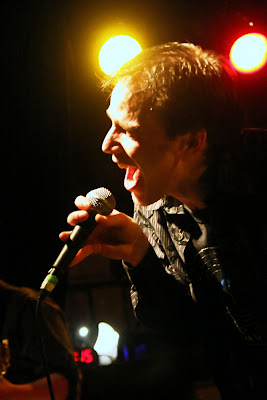
The Canon A620 has a slick feature in the white balance menu called ‘custom’. Once selected, you can target a section of the frame to use as “white”. For example, this week’s “Goldschlager” picture was shot with a background of white posterboard, so I could choose about anywhere to tell the camera what “white” looked like.

The picture was shot on my kitchen table, under standard tungsten lights with clear bulbs. We have a chandelier (sp?) of 5 60W bulbs over the table, and 6 inset lights embedded in the ceiling to the right of where the picture was taken. The “tungsten” white balance setting on the A620 still has a yellowish cast, as does the Canon 30D with which I sometimes shoot. Using AWB under these lights gets close, but it often still has a yellowish cast.
So, how do you fix that? That’s where color correction in postprocessing comes into play. GIMP has (and I’m sure Photoshop and other quality packages also have) similar features as the in-camera version I described above. Im GIMP, there’s at least two different places to make that form of color correction: in Layer->Colors->Levels, there’s tools that allow you to specify “white” and “black” for the picture, and it’ll do a lot of the necessary color correction for you. The other place I know of is when loading a RAW image with UFRaw: The WB tab allows you to set your white balance levels, and there’s a dropper button as well: click a spot on the image that’s white, then click the dropper button, and let the software do its work. For example, this is the shot I took (and subsequently posted) for Band Literal:

For H2O, three weeks after Band Literal, I learned more about color correction, and using the features of GIMP to go back and clean up the shot. “Meat Puppets” is one I revisited. I went back to the original RAW image, which pre-cropping had a section of my tshirt under my arm (on the right). I was wearing a white t-shirt when taking the shot, so I told ufraw to use my shirt as the reference for white. Then recrop, resize it again, and this was the result:

Much cleaner, much more natural. Now, if you’re going to be doing a shot that just doesn’t have any white in it at all, take a sample shot or three with a white postcard, posterboard, tshirt, piece of paper, SOMETHING. That’ll give your camera and/or software something that it can lock on to as to what “white” looks like in that lighting situation, and then you can adjust accordingly.
Good luck!
April 19, 2007 at 3:19 am #9330Analogy
ParticipantThe downside of using photoshop to fix your white balance is saturated whites get shifted as well:
The original photo was a bit yellow and I shifted it to look more natural and now the whites look bad. I shot that event JPG thinking, oh, I never do all that much modification to my band photos (WRONG), I’ll just save space on my memory card. In the future I’m just going to shoot RAW and handle white balance issues in my RAW tool.
April 19, 2007 at 4:31 am #9331ParticipantPart of the problem there is you are shooting straight into a 500/750/1000W light source, which is overexposing the image. There’s only so much you can really do to recover from that– shooting RAW will help, but when you’re blowing out the image, you can only get so much detail back.
April 19, 2007 at 8:20 am #9332ParticipantNo no, the exposure is right on in that picture. I was intentionally going for the rim lit look. But pull out your eyedropper tool and sample the “whites” in the picture. Due to the white balance correction I performed, the whites were turned blue, which ISN’T desireable. I want them to be pure white.
April 25, 2007 at 3:40 am #9333Curious
Participantback in the day when we wore onions on our belts and shot film the trick was to make exposure one a shot of the palm of your hand. gave the photo processor a flesh tone to balance to.
August 22, 2007 at 9:12 am #9334SilverStag
ParticipantHeh, Curious, I thought I was the only one around here that remembered that trick.
It’s fun sometimes to deliberately get the WB ‘wrong’: see here for a recent example from my playtime last week.
September 26, 2007 at 6:00 pm #9336boringolddoug
ParticipantHmmm, and I’ve been carrying around a colour board all these years.
-
AuthorPosts
- The topic ‘Quick-n-Dirty Guide to White Balance’ is closed to new replies.