Forums › Forums › Get Technical › Tips & Tricks › In-Camera Textures
- This topic has 13 replies, 7 voices, and was last updated 14 years, 11 months ago by
chupathingie.
-
AuthorPosts
-
August 4, 2011 at 11:58 pm #2177
 orionidParticipant
So, I got inspired from a discussion with some fellows of flickr, and this is the first result from playing around with “in camera” textures.
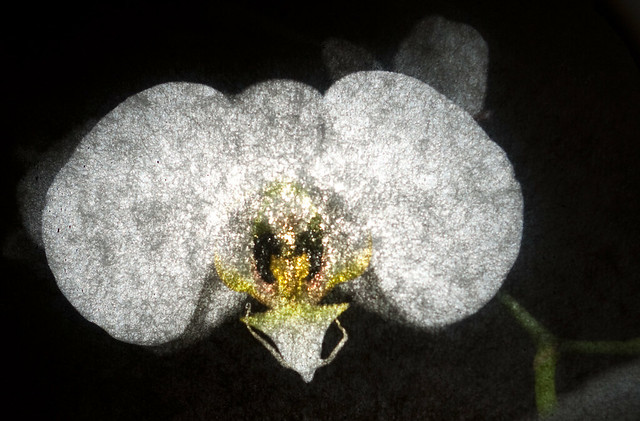
Texture Test 3 by Orionid, on FlickrNo photoshopping other than crop.
Basically, it works by using one lens to project an image onto a semi-transparent medium, in this case white tissue paper, then focusing on the back side of that medium with a macro lens so that you pick up both the projected image and the texture of the material.
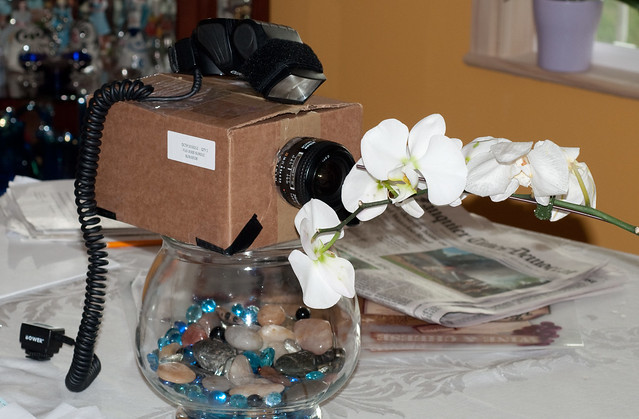
Textured Setup Outside by Orionid, on Flickr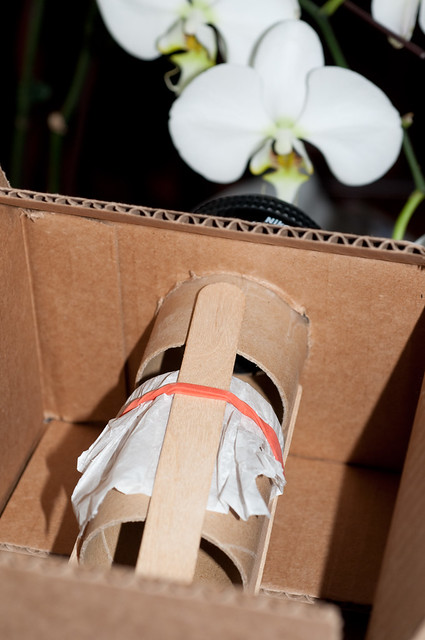
Texture Setup Inside by Orionid, on FlickrAugust 5, 2011 at 12:31 am #36651ravnostic
ParticipantVery cool! If I re-assemble the magic lantern projector, I bet I could make it work for this effect–it’s got that honking 4: magnifying lens that would blow up the darlot reflection and put it into a nice focal range. Definitely on my ‘hey you gotta try this’ list. You find the most creative ideas! 🙂
August 5, 2011 at 2:26 am #36650CauseISaidSo
ParticipantInteresting, but I think I’m missing something on the setup. If I understand your setup correctly, you’re using the lens to project the image of the flower onto the tissue paper that’s wrapped around the end of the middle cardboard tube, lighting it from the front using the flash. Where’s the camera go, though? I assume it would have to take the image from the other side of the tissue paper (the inside of the middle tube)?
Also, it sounded like from some of their descriptions, that they (others in the flickr group) were projecting a negative onto the textured surface and then photographing that from behind, which sounds like more of a traditional use of a projector, whereas your setup would let you photo anything in front of the lens.
August 5, 2011 at 3:57 am #36649orionidParticipantRav, your projector would probably work quite well with a similar setup.
Yeah, there’s another hole in the back of the box where I stick my slr lens through. The 60mm 2.8 macro works perfectly for filling up the frame with the projected image and focusing that closely. Some of them had done a negative/slide film setup to add texture to an existing photo, but the guy I was talking to had a fairly interesting setup that he was using, including using a children’s telescope as the front optic. And another guy has a little bit cleaner setup.
Right now, the setup I have functions, but is kind of clunky and bulky, but I’m just kind of playing for fun. If it turns into something I want to keep in my back pocket (for, say, filtered or looks-like-photoshop type contests, or just something that screams “Texture me”), then I’m thinking a box with a dedicated MF lens and quick-change texture plates will be in the works. You know, after we finish moving and I get my playtime optics out of storage.
August 5, 2011 at 4:40 am #36648ParticipantMichael’s Crafts sells wood boxes for cheap that I’d bet you could work with orionid for a more stable and permanent rig. I’m kinda leaning that way myself, should the focal length not work out with the projector. I think I’ll play with this idea a bit this weekend.
August 5, 2011 at 4:50 am #36647Yugoboy
ParticipantThis only works with translucent textures, right?
If I wanted to use a brick wall texture, I’d still have to use the NEF-based in-camera image merge, right?
August 5, 2011 at 9:54 pm #36652sleeping
ParticipantAre you shooting the textured surface at 1:1 magnification or so? It seems like you could maybe shoot some overexposed slides of textured surfaces and project images onto them. BW negatives (underexposed in that case) might work too….
August 5, 2011 at 11:22 pm #36653orionidParticipantRav – I was thinking along those lines or a cigar box. Post whatever your playing around produces.
Yugoboy – Yeah, too clear and you get a hotspot from the lens itself passing direct light, and too opaque and there’s not much of an image left to work with. There is one fellow on flickr who managed an image through 1/8″ thick styrofoam. That’s an awesome texture, even if the image is completely obscured.
Sleeping – 1:1’s the ultimate goal, that way I can minimize wastage of sensor space. Right now I’m cropping out a fair bit of carboard tube along the edge, but I’m also just playing around. I’d had the idea of using negatives or slides as either the texture or the target of the objective lens, but I figured while an interesting photo idea, it would cross a farktography boundary. As is, I figure it’s more of a TTV with an unusual filter, but using a negative or slide would push it into “sandwiched negatives.”
Here’s some more shots from playing around today.
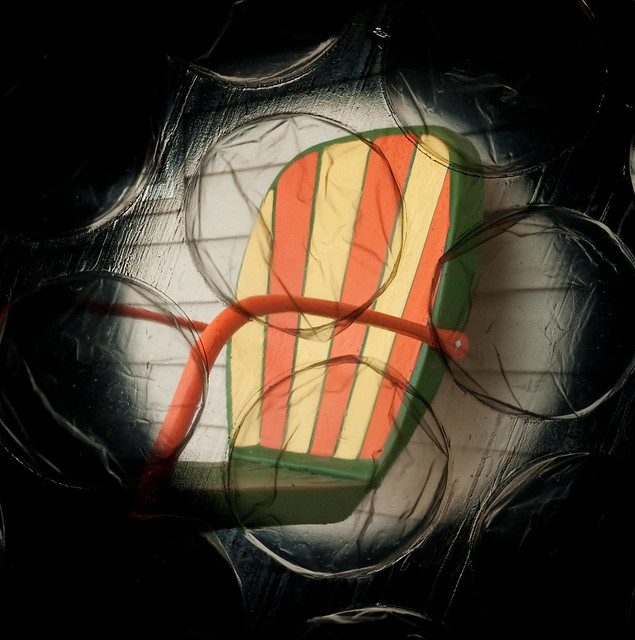
Texture Test – Bubble Wrap, Exposed for Hotspot by Orionid, on Flickr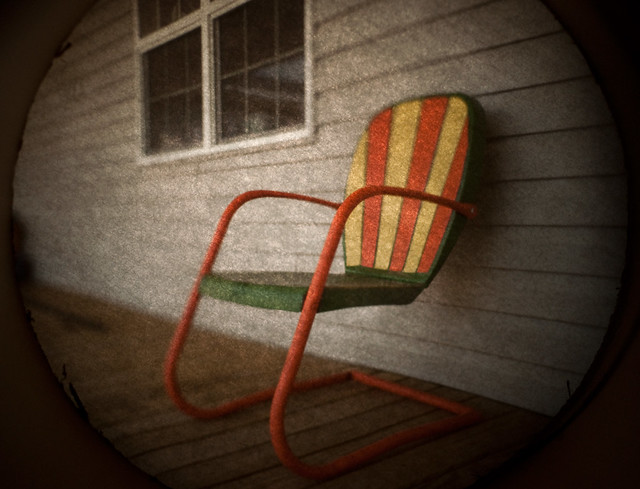
Texture Test – Baking Parchment (Non-Wax) by Orionid, on Flickr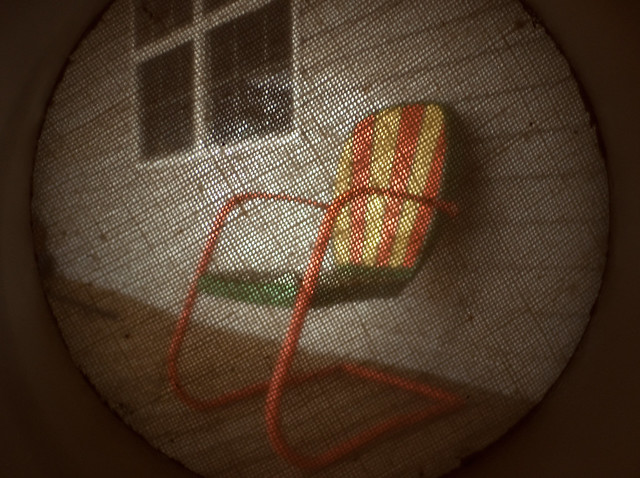
Texture Test – Coarse Fabric by Orionid, on FlickrAugust 6, 2011 at 12:34 am #36654Zero_Exponent
ParticipantLike the bubble wrap.
August 8, 2011 at 10:40 pm #36655ParticipantMy first effort. Details in the description. Off to try other textures…
http://www.flickr.com/photos/52058597@N08/6023254171/
//edit: For what they’re worth (and it’s not much):
I recently bought a bag of tech-clean non-lint wiper cloths (such as we use at work in the cleanroom environment) for my camera lenses/sensor. This is one of those:
http://fossilspringsaz.com/pics/2011/aug/08/ML002.jpgThis one is using a meshed material used in sewing, for pattern-making:
http://fossilspringsaz.com/pics/2011/aug/08/ML006.jpgSeems the goal here is to focus as clearly as possible on the foreground element, while maintaining clarity of the background element–kinda tricky with gauzy materials, finding that right focal point.
Will try further/harder, may do gooder/fail better.
😉
//further edit: I like these slightly better.
This is using a type of gauze called a mirasorb sponge. There’s a lot of cellulose-type fibering, which appeared to really tweek the image anywhere near the edges of it. A Gaussian blur? 😆
http://fossilspringsaz.com/pics/2011/aug/08/ML008.jpgSame scene, but with a few layers of a very loose gauze:
http://fossilspringsaz.com/pics/2011/aug/08/ML009.jpgParchment paper**:
http://fossilspringsaz.com/pics/2011/aug/08/ML010.jpg
http://fossilspringsaz.com/pics/2011/aug/08/ML011.jpg
Incidently, O, what are you using to hold your material in the proper focal position? I bought a small wood frame (99 cents, Michael’s Crafts–you can see it in ML010–window is 2-3/8 x 3-3/8) and some binder clips. Once I’m in the general position, I broaden out the clips’ doo-hickey-wire removal grasps to hug the tin sides of the lantern, and fine-‘toon’. Thus far, I can angle, *moderately*, the entire contraption. I’d like to see if I can get the exact focal point nailed down, mark the interior, and come up with a better way of being able to position the frame correctly without having to fiddle with it so much, and also be able to position the box at more extreme angles (I’m thinking wouldn’t a lightning picture done with this process look phenomenal?)
I’ve got something of an advantage as well–as yet; I’ve misplaced the brass screws that held the Darlot to the box. So at the moment, I’m just using the 2 4-inch lens configuration, which look like this: |)(|
This arrangement puts my current focal point about 2 inches behind the lens, giving me (correct me if I’m wrong, please) an f/.5. I get a ton of light; exposures for these shots have been as little as 1/640th second at ISO 100. I’m going to play around the complex when the sun goes down.
I’ll take the Darlot apparatus to ACE and see if I can find the right sized screws so I can remount it without damage–I’ll lose the f/stop, but I think I’ll gain quite a bit more–including (I hope) reduced CA.
**and here is where I learned that having the sun in a scene where you are trying to focus upon a piece of paper is not *such* a good idea. Parchment paper does take a while to burn–but it can, and does, given time. Oops!!
August 8, 2011 at 11:58 pm #36656orionidParticipantcan’t wait to see the rest.
August 9, 2011 at 2:20 am #36657ParticipantIncidently, O, what are you using to hold your material in the proper focal position? I bought a small wood frame (99 cents, Michael’s Crafts–you can see it in ML010–window is 2-3/8 x 3-3/8) and some binder clips.
Ha! That should read as two-and-three-eighths by three-and-three-eights.
Curses! Emoticon’d again!! 😛
August 9, 2011 at 10:53 pm #36658Participantplastic shopping bag (meah–like the subject, though):
http://fossilspringsaz.com/pics/2011/aug/08/ml012.jpg
http://fossilspringsaz.com/pics/2011/aug/08/ml013.jpgand FINALLY one that I actually think is pretty good. The texture worked well with the subject:
http://fossilspringsaz.com/pics/2011/aug/08/ml014.jpg
(A visit to the dollar store, and a piece cut from a chinese-style plastic ‘to go’ container.)
August 10, 2011 at 1:31 pm #36659chupathingie
Participant(A visit to the dollar store, and a piece cut from a chinese-style plastic ‘to go’ container.)
Oooohhhh…. that one came out very nice! I especially like the way the texture transforms the archway into irregular cut stone…
-
AuthorPosts
- The topic ‘In-Camera Textures’ is closed to new replies.