@flavivirus
Forum Replies Created
-
AuthorPosts
-
August 28, 2008 at 2:54 pm #18226
Flavivirus
ParticipantI worried about the build quality of the panosaurus when I first saw it, but I’ve heard it’s excellent. I’ve yet to purchase any of them, so I don’t really know about the prices. I guess $300 stuck in my head… but if you can get a panosaurus for 85 I might just go see what that bad boy’s all about 😛
The parking garage rocks regardless, corsec67 🙂
To nobigdeal, I actually thought about posting that guide before the contest and tried my ass off, but I just didn’t get it done in time. It’s been sitting on notepad on my laptop for about 3 days now 😛 Between my day job running around China and Hong Kong, my night job of exploring Chinese food (and somehow losing weight, must be tapeworms?!) and my unbelievably harsh asian birdflu (not really, but good lord was I sick), I just didn’t get it done 🙁 Sorry… but I hope there are some points that are helpful! Better late than never…
August 28, 2008 at 1:48 pm #18221ParticipantAnd U-man… more frames would help with the building (you’ve chosen one of the hardest panoramic subjects in the world by the way, a building that approaches you!), a panoramic head or figuring out how to rotate the camera on its nodal/parallax point would create seamless lines.
August 28, 2008 at 1:40 pm #18220ParticipantI’m glad people enjoyed this… it’s one of my passions so I hope it catches on 🙂
I’m probably one of the more experienced panorama users… I’ve been doing it for 4 years now. The baseball picture is one of the first major panoramas I did, in the summer of 2005 😛 So it was very cool to use it this week!
To answer some of the questions about panorama photography that I’ve seen:
COMPOSITION: Look at your scene, decide what the focal point of your picture will be and how it will be framed in a panoramic shot. For example, if you have a building you like, it’s good to stand at the very center and shoot around it, or stand to one side of it and shoot around it so it is off to the side. The rule of threes really doesn’t apply to panoramas very well, I call it the rule of 5ths. Because a panorama is usually about 5x as wide as it is tall, you can imagine your guidelines as a grid like: [][][][][] I tend to find the more powerful shots have prominent figures inside those brackets. Vertically, the rule of thirds apply.
LIGHTING: Exposure is key… as we can see this week… even if its meant for artistic effect, a panorama can really lose a lot of power if the exposure settings are not consistent for every exposure. I generally use my D50 and focus on the entire scene, panning across it at my lens’ optimal f stop, reading the meter to decide on exposure length. You want to avoid blown highlights at all costs for a panorama, because while it may look OK zoomed out, in reality, a blown highlight could be very very big.
KEEP IT LEVEL: Again, highlighted in this contest, uneven pictures create a “jagged” effect that can be artistic, but often simply makes it look like an incomplete mars rover picture. Tripods are helpful here, but so is simply keeping an eye on the horizon and keeping it in the same place in your viewfinder. Keeping the camera level as you rotate is MUCH HARDER than it sounds, so be very mindful that as you twist your hips, you tend to tilt the lens in the opposite direction. The straighter the images, the easier the stitching software will be able to find good matches.
DO YOU NEED A PANORAMA HEAD?: These can be cheap or expensive, depending on the quality. My short answer is absolutely not. I’ve never used one, and I have a ton of high quality panoramas. However, if you:
1) don’t have a lot of experience in spot correction digitally
2) want to take indoor panoramas (real estate, art exhibition, etc) or panoramas of objects at varying distances
You would definitely notice a difference between a regular tripod and a panorama head.Corsec67 is quite right… his parking garage image, striking as it is, has many stitch errors on the parking lines due to the camera not rotating on its nodal point. Had he dropped $300 on a panorama head, those parking lines would have come out smooth.
SHOOTING: Easy rule. Only the center 3/5ths of your image should be “new” with each shot, 1/5th on either side should be overlap. This is helpful not only for the computers stitching efforts, but also to keep your lens’ sweet spot focused and to reduce the harmful effects of vignetting on panoramic photography.
ADVANCED SHOOTING TIPS:
1) Time is on your side. You do not have to capture your panorama in 5 seconds (unless you are strictly photojournalistic!). If you are taking a panorama of a crowded street, for each shot, wait until there is nobody straddling the borders of your image! Just wait until there’s a free space, then click! This will reduce “people ghosting” / “halfpeople” that are in a ton of panoramas.
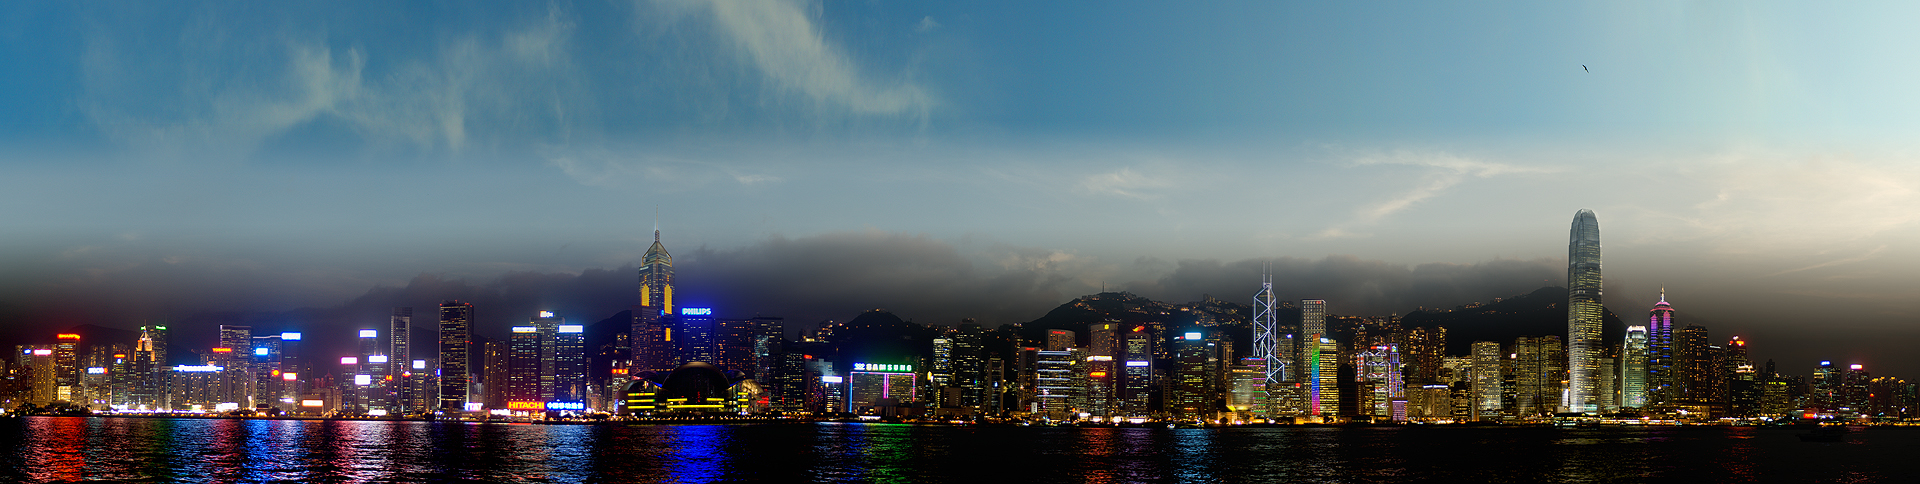
2) Add Sky. If there are some cloudy textures to be seen, take another row panorama of the sky ABOVE your panorama, at the same exposure settings. This extra row could add valuable real estate and also provide natural beauty. My HK Harbour is an extreme example of that… 7 rows are represented! (In reality, there is only about 4 rows of data, but I used 7 rows with significant overlap). Had I stuck with one row, it would have simply been the buildings.
3) Crop your final image. Some programs do it automatically, some don’t. You may go for the effect, but most people would prefer to look at a rectangular image for the finished product.
4) Go Vertical. Vertical panoramas are MUCH MORE Challenging than horizontal, due to the sharp parallax difference between the ground you’re standing on and infinity off in the mountains you’re looking at.
Recommended software:
Expensive: Adobe Photoshop (CS 2 is inferior to CS 3, and honestly, CS 3 rivals the best panoramic stitching software out there… I used to be very uppity about doing things manually, but CS 3 does a quick, efficient, and usually accurate job)Not Cheap but Not Expensive: ArcSoft Panorama Maker 4 (It does NOT work well for tiled panoramas, despite what the packaging says, but it is a very powerful program for vertical and horizontal stitching.
Cheap: Autostitch – the king! As cheap as you want it to be, and while not simple, it is not difficult to learn. I find it tends to create more banding problems than other software, but you can’t beat the price.
Manually (do-it-yourself): It’s very easy. Align the pictures up, starting from the middle, at 50% opacity, and then blend the layers together. You can use the paintbrush to fine tune your mask if you see ghosting. This is time intensive but more satisfying results are almost guaranteed.
August 28, 2008 at 1:09 am #18203Participantthanks Elsinore!
you’re the best
August 28, 2008 at 1:00 am #18200ParticipantI have 3 posts in a row… only about 5 from bottom right now. The first one and third one need to be deleted. The second baseball one is the one that I want up. The first one had part of the explanation from my HK Harbour picture in it.
August 28, 2008 at 12:48 am #18198ParticipantI made a booboo in my 3rd post, if a mod could rectify would be greatly appreciated 😀
August 28, 2008 at 12:14 am #18197ParticipantHahaha, thank you! Again, patience was required, because I was waiting for eeeverything to line up. Tho the panorama for that one was snapped in about 15 seconds. 😛 The Day to Night one looks very unassuming at 161 pixels tall. Farktography was not made for this contest… but I know we’re gonna rock it no matter what 😉
FV
August 27, 2008 at 4:56 am #18194Participantnobigdeal, corsec67, u-man, killerclaw, shoosh, teffy… thank you all for the compliments. it means a lot for me to hear you guys say such nice things!
dunno how it will do, i would love it to do well but I thought my John Legend picture would win “Blue” 😛 hahaha. Repeats mantra: It’s not photography, it’s Farktography.
Shoosh, it looks very good full size, but because i was tripodless, all i see are the few stitching errors 😛 I will go back someday and do it all again with a tripod, now that I know how good it looks.
I also way over-shot… you only need about 4 layers of 11 photos each, not 7 layers of 50 😛
FV
oh and teffy, I’m happy you like it, but I charge $50 per autograph, and you have to contact my manager 😛
August 26, 2008 at 8:11 pm #18179ParticipantI’m happy if i get top 10, with the talent in Farktography! The best part for me is that I actually did this effort (can I mention it was 33degrees and humid?) entirely for the contest, even though I have 600+ panoramas on my laptop!), so whatever votes I get, I will feel like I REALLY earned them, even if it’s just my own 😛
Often in the contests, I’m trawling through my archives or coming up with a last minute idea… this one, I had the inspiration “do a day long panorama!” and went banzai for it… so… yeah. this is my baby.
August 26, 2008 at 8:03 pm #18177ParticipantOh, and it was taken by doing 7 rows, starting from the top, of 50 photos each @ 50mm. Each row was done every 50 minutes 🙂 Each row was stiched by computer and then thrown out because photoshop hates me. So, each row was stitched manually, then each row was stitched on top of each other.
August 26, 2008 at 7:54 pm #18176ParticipantOK… panoramas have long been a hobby of mine, so for 2 i’ll be selecting from my archive (about 600 or so to choose from!)… but i decided to do a farktography only one, and the results are interesting! I will go back later and do it “perfect-er” with a better setup and actually remember to bring my tripod!! (for the night portions, I had to take 12 consecutive images and toss the 11 least stable :P).
Hong Kong Harbour, Day to Night

Taken from 4:00pm-10:00pm
350 consecutive pictures
Final image size 140megapixels
Stitched by hand (every program I had failed), so the old “copy, paste, blend, copy, paste, blend” technique.
No spot corrections!
Spent about 3 hours waiting for swap memory… grrr…This is a bigger version, but the one that i’m hanging onto for me is ginormous, I love it so much I think I’m going to get it printed and hang it 😛
so my question is… how should i present it?! it looks horrible at 161px tall (The banding of day-night is so grotesque)
[/img]August 20, 2008 at 1:33 pm #17704ParticipantI think SS’s is good for a silhouette… but I think Caradocs is really a framed picture of a model. If the silhouette was the subject I think my eye would be drawn to it quicker… the out of focusness of it probably, but also that the model is perfectly in focus, highlighted, and in that 2/3rds zone. (well, if you look at the frame formed by the photographer.)
my vote don’t count, but I’d say no.
August 19, 2008 at 3:21 pm #17694ParticipantI think U-man’s picture would work… I mean, it’s exactly as described – a backlit photo where the border and overall shape of the object are highlit. I do not see how you can avoid taking a picture of a shadow when you’re backlit, but I think the point of the difficulty is that you can’t take a picture of your shadow cast on something. Like a picture of the shadow of a man in a door frame, as projected onto the floor. However, if the picture was from the floors perspective, of a backlit man standing at the door… then, that’s a silhouette.
Just my two cents. Avoiding shadows is kind of impossible for this line of contest 😛
August 13, 2008 at 4:25 am #18477ParticipantThats your CMOS sensor showing its weak spots. These dots are actually going to be static – every time you take the exposure, the same dots will be “hot”. One of the ways to negate this is to take a second picture with the lens cap ON for the same length of time, overlay it into photoshop and “subtract” 🙂
FV
August 12, 2008 at 2:58 pm #18474ParticipantOh and for anyone who’s interested in my blog, it’s basically a photoblog of Asia… you can check it out at this link.
-
AuthorPosts